You think about adding side panels to the carport because rain keeps blowing in. Then you worry it will feel dark, hot, or too boxed in.
Side panels can help a lot, but they also change wind pressure and airflow. In Japan, tsuyu rain and typhoon gusts make the trade-offs real, not theoretical.
In this guide, you’ll learn how to choose carport side panels without creating new problems. You’ll balance rain blocking, wind behavior, and light so the carport stays comfortable year round.
Hi, I’m Ken — I’m Japanese, and I live in Malaysia long-term, so I explain everyday life in Japan from a practical ‘from abroad’ perspective.
I hold a building design qualification and I’ve been on site for 20+ years across hundreds of jobs. I turn Japan’s unspoken rules into simple checks, so you can avoid costly mistakes and take the next step with clear actions that feel safe.
1. Carport side panels choice: 5 checks
Pick panels for your weather pain not for looks—rain block is useless if wind turns it into a sail.
First confirm what you are trying to stop: sideways rain, morning sun glare, dust, or neighbor sightlines. Each goal points to a different panel type and gap plan. In Japan, narrow lots often put carports beside walls and fences, so airflow and light are already limited. Your choice should reduce trouble, not stack it.
- Identify the open side that gets rain most
- Check if the carport feels dark in daytime
- Note wind direction during storms at your door
- Decide if you need privacy or only rain block
- Measure clearance for door swing and walking lane
You might want “full coverage,” but full coverage can create heavy wind load and humidity pockets. If you choose based on the true pain point, you can keep it light and safe. Panels should guide weather away, not trap it. Start with the minimum needed.
2. Rain block wind and light
More rain block usually means less airflow and less light—you must trade on purpose.
Solid panels stop spray best, but they also catch wind and darken the space. Slatted or louvered panels let wind and light pass while reducing splash, but they won’t stop fine mist in typhoon gusts. In Japan, wet seasons mean you also care about drying speed, not only dryness in the moment. Choose a panel that still lets the area breathe.
- Use slats when wind is strong in storms
- Choose clear panels when daylight is limited
- Leave a bottom gap to release wind pressure
- Angle louvers to block rain but keep light
- Anchor into structural posts not thin trim
You might think clear panels solve everything, but clear can create glare and heat depending on angle and season. You might think solid panels are safest, but they can overload anchors in gusts. The best setup usually mixes partial blocking with airflow paths. If you plan gaps and structure, you get the benefits without the trap.
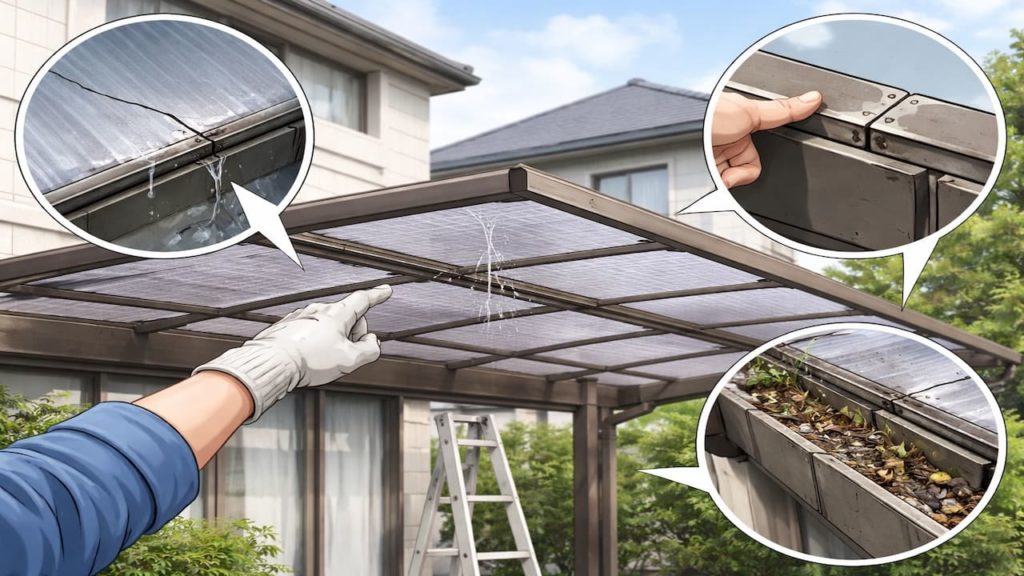
3. Why side panels can create new problems
Panels change the whole airflow pattern—and that changes moisture, noise, and stress.
Once you block a side, wind can accelerate around edges and create suction, which can increase rattling. Moist air can also get trapped, slowing drying and encouraging grime buildup. In Japan, humidity already makes drying slow, so reducing airflow can increase musty smells and algae near bases. Panels can also reflect sound, making rain louder at night.
- Wind pressure increases on anchors and braces
- Airflow loss slows drying after rain events
- Moisture pockets increase grime and algae growth
- Edge gaps whistle and rattle in gusts
- Dark zones increase trip risk while unloading
Some people add panels then wonder why the carport feels worse. It is usually because the design became a box without ventilation or light planning. If you keep top and bottom relief and avoid full solid walls, you reduce most of that. Treat panels like a wind device, not just a screen.
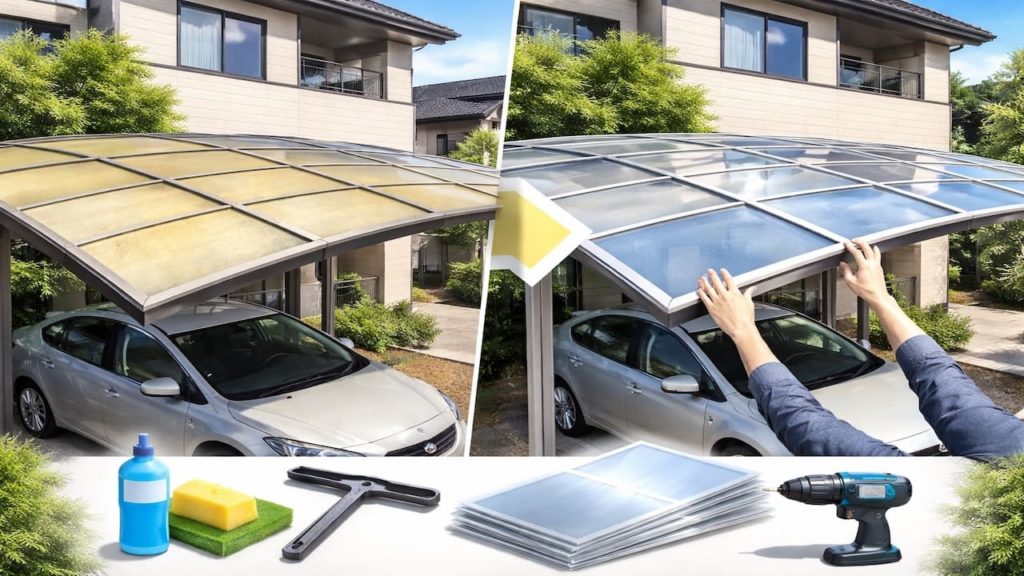
4. How to pick the right panel setup for your lot
Start with partial coverage and test before going full—one good panel can change everything.
Install on the worst exposure side first, then observe during one rainy week. If you buy panels or hardware, expect ¥10,000–80,000 depending on material, size, and whether you need extra bracing or custom work. In Japan, choose weather-resistant fasteners and plan a quick removal option if typhoon winds are extreme. Your aim is a setup you can live with, not just a catalog look.
- Block only the windward side first
- Keep top vent gap to release pressure
- Use bottom gap so water and wind escape
- Add extra anchors if panel acts like sail
- Test in rain and adjust louver angle slowly
You might want to finish it in one shot, but staged changes teach you what the site really needs. If one side panel solves 80% of spray, stop there. If you need more, add it with airflow and structural support in mind. Build toward comfort, not toward enclosure.
5. FAQs
Q1. Should I choose solid panels for the best rain block?
Solid panels block spray best, but they also catch wind and reduce airflow. If your area gets strong gusts, slats or louvers may be safer. Choose based on storm wind behavior, not only rain amount.
Q2. Will side panels make the carport darker?
Yes, especially with opaque or solid designs. If daylight matters, consider clear panels or slatted designs. Also add downward lighting so you can unload safely at night.
Q3. How much gap should I leave at the bottom?
Enough for wind relief and drainage, often a hand-width or more depending on setup. A bottom gap prevents the panel becoming a sail and helps drying after rain. Keep it consistent so it looks intentional.
Q4. Can side panels increase noise?
They can, because they reflect sound and can rattle in wind if not tensioned and anchored well. Use more attachment points and avoid loose edges that flap. Good hardware matters more than material here.
Q5. When should I avoid panels entirely?
If your carport structure is already shaky, or wind loads are severe and you can’t reinforce anchors, avoid adding large solid panels. Also avoid if airflow is already poor and you struggle with damp grime. Fix drainage and stability first.
Pro's Tough Talk
I’ve spent 20+ years working around Japanese homes, so I’ve seen what tends to work—and what tends to go wrong—in everyday use. Side panels feel like a smart upgrade until the first gust turns them into a sail. In Japan, typhoon wind doesn’t care how pretty your panels look.
Three things decide success: how much wind you trap, how much light you kill, and whether your anchors are real structure or wishful screws. You’re not picky and the product isn’t cursed, but physics is strict. A solid panel is a billboard in a storm, louvers are like eyelashes that still breathe, and bad anchors are toothpicks in a watermelon.
Pick the windward side now. Plan the gaps today. Test one side this weekend.
If the frame flexes when the panel loads up stop and reinforce before you add more. If the space turns dark and damp, you went too solid and too sealed. Build for airflow and visibility, then rain blocking becomes a bonus instead of a new headache.
Yeah, sure.
You install a full wall, feel proud, then the first storm hits and it flaps like a giant drum. Now you’re out there at 1 a.m. holding the panel like you’re wrestling a sailboat. Great hobby.
Summary
Side panels can reduce sideways rain, but they also change wind load and light. Choose based on your main weather pain and keep airflow paths so the carport can dry.
If you go too solid, you may create dark damp pockets and increase stress on anchors in storms. Start with partial coverage on the windward side and adjust after real rain tests.
Today decide one side to block and one gap to keep so you get rain relief without turning the carport into a sail. Then keep improving with related wind and drainage checks across seasons.