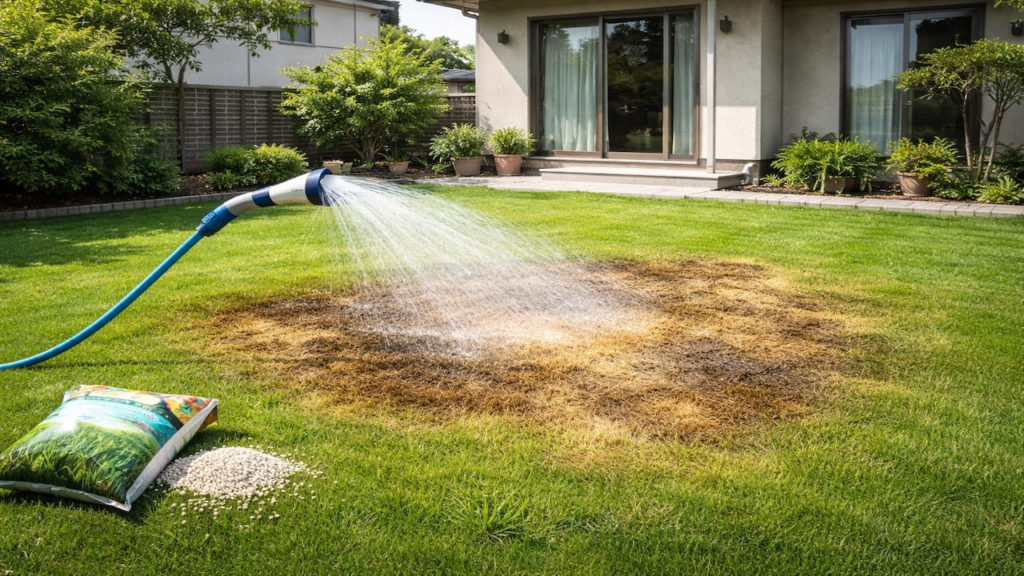
You lay sod and it looks perfect for a day, then you start seeing gaps and lifted seams. Those gaps dry out fast and turn into ugly lines.
Most sod gaps come from rushed soil prep, uneven grade, poor seam fitting, or skipping the roll. In Japan, humid rain followed by sudden sun can shrink and stress edges quickly if the sod is not tight and well-seated.
In this guide, you’ll learn how to install sod without seam gaps. You’ll check soil prep, seam fitting, and rolling so the sod knits together instead of pulling apart.
Hi, I’m Ken — I’m Japanese, and I live in Malaysia long-term, so I explain everyday life in Japan from a practical ‘from abroad’ perspective.
I hold a building design qualification and I’ve been on site for 20+ years across hundreds of jobs. I turn Japan’s unspoken rules into simple checks, so you can avoid costly mistakes and take the next step with clear actions that feel safe.
1. Lawn sod installation 5 checks to avoid gaps
Seam gaps happen when sod never makes full contact with moist soil.
Sod needs contact like tape needs a clean surface. If the base is lumpy or dry, edges lift and shrink, then seams open. In Japan, small yards often have tight edges by walls where soil dries unevenly, so seam lines show faster. Contact first.
- Check base grade for bumps and dips
- Confirm soil is moist not muddy before laying
- Fit seams tight with no overlap or stretch
- Stagger joints like bricks across the lawn
- Roll the sod to press roots into soil
You might think gaps can be filled later with soil. That is a patch, not a fix, and it often dries into a crack again. The real win is tight seams and full contact from day one.
2. Soil prep seams and rolling
Prep the base and rolling decide if seams knit.
Soil prep is about leveling and making a firm but receptive bed. Seam work is about tight fit without stretching. Rolling locks the sod into the bed so edges do not float. In Japan, rain can soften poorly prepped soil and create tiny settling, so seams separate if the base was not firmed. Firm bed. Tight seams.
For basic supplies like a rake, leveling mix, and a rental roller, expect about ¥5,000–20,000 depending on area and rental options. If you already have tools and can borrow a roller, cost can stay lower.
- Remove debris and break clods before leveling
- Firm soil lightly so footprints are shallow
- Press seams together and trim clean edges
- Topdress seams lightly after rolling to seal
- Water immediately so the base stays evenly moist
You could argue rolling is optional. It is not if you care about seams. Rolling turns “looks laid” into “is seated,” and that decides whether gaps open during the first hot day.
3. Why sod seams open after installation
Seams open from shrink, dry edges, and uneven settling.
Sod can shrink slightly as it dries, especially at edges. If seams were not tight, small shrink becomes visible gaps. If the base settles unevenly, seams pull apart or lift. In Japan’s climate, a humid night can keep the surface damp while the seam edge dries in sun later, creating uneven stress. Edge stress.
- Dry edges shrink and pull away from each other
- Uneven base makes joints bridge over air gaps
- Stretching sod during laying rebounds into gaps
- Skipping rolling leaves voids under seams
- Late watering lets seams dry before rooting starts
Some people blame “bad sod.” Sometimes quality is an issue, but most seam gaps are installation mechanics. If you fix contact and moisture, even average sod knits better.
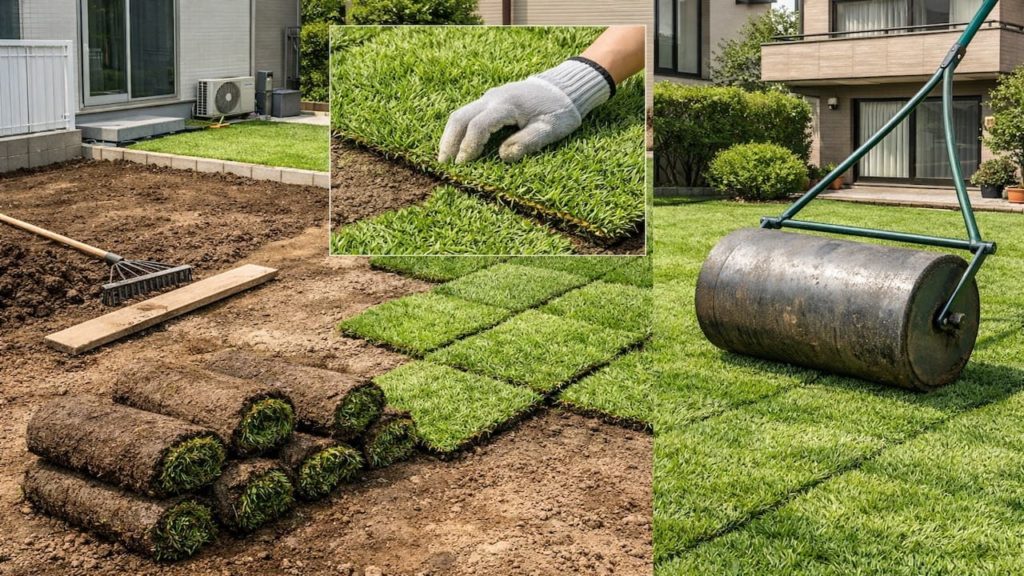
4. How to install sod so it stays tight and roots fast
Lay fast, keep seams tight, and lock moisture in early.
Plan so sod goes down the same day it arrives, because sitting rolls heat up and dry. Start from a straight edge, stagger joints, and avoid skinny strips that dry out. In Japan, avoid installation right before heavy rain because runoff can wash soil into seams and shift pieces—pick a stable window and water right away.
For sod itself plus delivery and prep materials, ¥20,000–80,000 is a common small-yard range depending on area and sod type. Add roller rental or labor if you are not DIY.
- Lay sod immediately and keep rolls shaded
- Cut clean edges and avoid thin strips
- Stagger seams and kneel on boards to avoid dips
- Roll twice in crossing directions for full contact
- Water to depth and keep seams from drying
You might want to “pull sod tight” like stretching a rug. Don’t stretch it; it rebounds and gaps later. Fit it tight by trimming, not by tension. That is the difference between clean seams and future cracks.
5. FAQs
Q1. How tight should sod seams be?
Seams should touch with no overlap and no visible soil line. If you can see soil between pieces on day one, it will become a gap later.
Q2. Should I topdress seams with soil?
Light topdressing can help seal tiny lines after rolling, but it should not be used to hide big gaps. Big gaps mean poor fit or poor base contact.
Q3. Is rolling always required?
For a clean install, yes. Rolling removes air pockets and prevents seam lift which is the main cause of gaps showing up later.
Q4. How soon should I water after laying sod?
Immediately after laying, then keep the surface evenly moist until rooting starts. The first day is critical because seams dry faster than the center.
Q5. What if I already have gaps after install?
Press pieces back together if possible, roll again, and topdress lightly to seal. If the base is uneven, you may need to lift a section and re-level the bed under it.
Pro's Tough Talk
I’ve spent 20+ years working around Japanese homes, so I’ve seen what tends to work—and what tends to go wrong—in everyday use. Sod gaps aren’t “bad luck,” they’re the lawn telling you the base and seams were sloppy.
Cold breakdown: uneven soil creates voids, seams aren’t cut tight, and skipping the roll leaves air like a bubble under tape. Then the first sunny stretch hits and the edges dry and shrink, like bread crust pulling away from the soft middle. You can’t cheat physics.
Seriously?
Level the base today. Fit seams by trimming tomorrow. Roll it properly this weekend and water like you mean it.
If seams are tight and sod is seated, gaps almost never appear. If you see soil lines on day one, stop pretending it will “settle in” and fix the fit before it locks in wrong.
Skip rolling and your sod will separate like it’s filing for divorce.
Summary
Sod gaps come from poor soil prep, loose seam fitting, and skipping rolling. Check grade, moisture, seam tightness, and contact before you think the sod is the problem.
Prevent gaps by laying sod fast, staggering joints, rolling for full contact, and keeping seams moist early. If gaps show on day one, correct them immediately before roots lock the pieces in place.
Make seams tight and roll for full soil contact. Once the sod is seated and watered right, it knits together and the lawn looks like one clean sheet.